
| Stampin' Kit
Paper
Accessories & Tools
|
Instructions
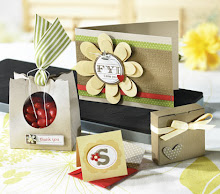
- Fold Designer Series paper around front of Baja Breeze textured card, and adhere.
- Punch vertical slot in end of Designer Series paper using Horizontal Slot punch. Tie Whisper White taffeta ribbon around front of card through slot.
- Stamp "Holiday wishes" in Riding Hood Red ink on Whisper White card stock. Staple to card.
- Sew top edge of card using sewing machine and thread.
- Stamp snowflake image in Old Olive ink on Whisper White card stock, and punch out using Scallop Circle punch. Apply glue to dot portions of snowflake, and cover with Dazzling Diamonds Stampin' Glitter. Shake off excess glitter.
- Stamp snowflake image in Old Olive ink on Baja Breeze textured card stock, and cut out center star portion of image. Turn star over so no ink is visible, and adhere to center of snowflake.
- Adhere large White halfback pearl to center of snowflake.
- Adhere Designer Series paper circle die cut to chipboard circle. Adhere snowflake piece to chipboard circle using Stampin' Dimensionals. Adhere chipboard circle to card.


No comments:
Post a Comment