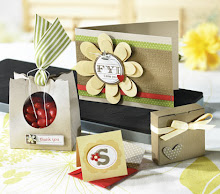
I also made a calendar gift set for each of the girls. The template came from Kristina.

Enjoy!!!

Glossy Snowflake
Stamp Set: The Snowflake Spot
Cardstock: White Glossy Cardstock, Purely Pomegranate
Ink: Pretty in Pink Classic Ink, VersaMark, Regal Rose Craft Ink, Black Stazon
Ribbon: 15/16" Wide Purely Pomegranate Satin Ribbon
Tools: Brayer, Heat Gun
Accessories: Iridescent Ice EP
• Stamp various snowflakes from The Snowflake Spot Stamp Set on the White Glossy Cardstock using VersaMark.
• Pour the Iridescent Ice Embossing Powder (which makes it glittery looking) onto the White Glossy Cardstock and tap off the excess.
• Use the Heat Gun to emboss the snowflakes.
• Roll the Brayer several times in the same direction over the White Glossy Cardstock using the Pretty in Pink Classic Ink.
• Stamp various snowflakes from The Snowflake Spot Stamp Set on the “Pretty in Pink” Glossy Cardstock using Regal Rose Craft Ink.
• Pour Iridescent Ice Embossing Powder over the “Pretty in Pink” Glossy Cardstock and tap off the excess.
• Use the Heat Gun to emboss the snowflakes.
• Tie a bow around the Glossy Cardstock using the 15/16" Wide Purely Pomegranate Satin Ribbon,
• Mono the Glossy Cardstock to the front of the Purely Pomegranate card front.
• Stamp a holiday message inside using Black Stazon.

Pink Christmas
Stamp Set: Season of Joy
Cardstock: Pretty in Pink, Wild Wasabi (Textured), Whisper White
Ink: Pretty in Pink Classic, Regal Rose Classic
Ribbon: 5/8” Regal Rose Wide Grosgrain Ribbon
Accessories: Pop Up Dots, Crystal Stickers
• Stamp on the front of the Pretty in Pink cardstock with Pretty in Pink Classic Ink using the large and small Flower/Snowflake images from the Season of Joy Stamp Set.
• Punch the 4 corners of the Pretty in Pink cardstock with the Corner Punch.
• Stamp the Celebrate ‘tis the Season image from the Season of Joy Stamp Set in Regal Rose Classic Ink on Whisper White cardstock.
• Tie a piece of the 5/8” Regal Rose Wide Grosgrain Ribbon around the Wild Wasabi textured cardstock.
• Adhere the Whisper White cardstock to the Wild Wasabi cardstock using 4 Pop Up Dots as well as adhere the Wild Wasabi cardstock to the Pretty in Pink card front using 4 Pop Up Dots.
• Adhere Crystal Stickers to the snowflake in the word “Joy” or add crystals to the 3 flowers at the top.

Tree
Stamp Set: Season of Joy, Many Merry Messages
Cardstock: River Rock, Real Red, Very Vanilla, Dashing Designer Series Paper
Ink: Old Olive Classic, Black Stazon
Ribbon: 5/8” Real Red Wide Grosgrain Ribbon
Tools: Mat Pack, Hobby Blade
Accessories: Pop Up Dots
• Mono a piece of Dashing Designer series paper to the left hand side of the River Rock cardstock.
• Using the Hobby Blade cut a line along the top scored edge of the card to insert the 5/8" Real Red Grosgrain Ribbon.
• Tie a bow around the larger piece of Dashing Designer Series Paper with the 5/8” Real Red Wide Grosgrain Ribbon.
• Stamp the tree from Season of Joy Stamp set using Old Olive Classic Ink on the Very Vanilla cardstock. Using mono, mount the tree to the Real Red cardstock. Using 2 Pop Up Dots, adhere the layered image to the right hand side of the River Rock cardstock.
• Stamp Season’s Greetings from the Many Merry Messages Stamp Set using Black Stazon inside the card.

Merry & Bright
Stamp Sets: Merry & Bright, Many Merry Messages
Cardstock: Real Red, Old Olive, Very Vanilla, Dashing Designer Series Paper
Ink: Black Stazon, Real Red, Only Orange, Sahara Sand Markers
Ribbon: 5/8” Real Red Wide Grosgrain Ribbon
Tools: 1-3/8" Circle Punch, 1-1/2" Circle Punch, Scallop Circle Punch, Paper Piercing Tool, Mat Pack, Liquid Glue
Accessories: Red Pom-Pom, Pop Up Dots, Crafter’s Tool Kit
• Tie a bow around the larger piece of Dashing Designer Series Paper with the 5/8” Real Red Wide Grosgrain Ribbon.
• Layer the 2 cut pieces of the Dashing Designer Series Paper to the front of the Old Olive cardstock and insert the Real Red cardstock in between the two Designer Papers using mono.
• Stamp the Snowman image from the Merry & Bright Stamp Set in Black Stazon Ink on the Very Vanilla cardstock. Color the Snowman with the Real Red, Only Orange and Sahara Sand Markers.
• Punch the Snowman image with the 1-1/2" Circle Punch.
• Punch out a piece of Real Red cardstock with the 1-3/8" Circle Punch and adhere these together with the 2 Pop Up Dots.
• Punch out a piece of Old Olive cardstock using the Scallop Punch. Pierce each scallop edge and adhere to the layered Snowman with 2 Pop Up Dots. Adhere the entire image to the front of the card using 2 more Pop Up Dots.
• Stamp Happy Holiday from the Many Merry Messages Stamp Set with Black Stazon inside the card.
• Adhere a Red Pom-Pom to the Snowman’s Hat using Liquid Glue.

Snowman Tag
Stamp Set: Tags for All
Cardstock: Chocolate Chip, Very Vanilla
Ink: Chocolate Chip Classic, Creamy Caramel, Bashful Blue, Pumpkin Pie, Chocolate Chip Markers
Tools: Handheld Punch
Ribbon: Kraft Taffeta Ribbon
Accessories: Waterfall Stickles
• Stamp the Snowman image from the Tags for All Stamp Set on the Very Vanilla cardstock using the Chocolate Chip Classic Ink.
• Color in the Snowman using the Creamy Caramel, Bashful Blue, Pumpkin Pie, and Chocolate Chip Markers.
• Adhere the Very Vanilla cardstock to the Chocolate Chip cardstock using mono.
• Punch a hole in the upper left hand corner using the Handheld Punch and tie a piece of Kraft Taffeta Ribbon.
• Add a touch of Waterfall Stickles to the Snowman’s hats.

Snowflake Tag
Stamp Set: Tags for All
Cardstock: Chocolate Chip, Sky Blue, Very Vanilla
Ink: Chocolate Chip Marker
Tools: Handheld Punch
Ribbon: 15/16" Wide Chocolate Chip Satin Ribbon
Accessories: Crystal Stickers
• Stamp the Snowflake image from the Tags for All Stamp Set on the Very Vanilla cardstock using the Chocolate Chip Marker, which will make the image deeper. You may use the Chocolate Chip Classic Ink if you prefer a lighter image.
• Adhere the Very Vanilla cardstock to the Sky Blue cardstock using mono. Then adhere the layered image to the Chocolate Chip cardstock.
• Punch a hole in the upper left hand corner using the Handheld Punch and tie a piece of 15/16" Wide Chocolate Chip Satin Ribbon.
• Adhere a Crystal Sticker to the center of the snowflake.

Merry Tag
Stamp Set: Tags for All
Cardstock: Purely Pomegranate, Very Vanilla
Ink: Purely Pomegranate
Tools: Handheld Punch
Ribbon: 15/16" Wide Purely Pomegranate Satin Ribbon
• Stamp the Merry image from the Tags for All Stamp Set on the Very Vanilla cardstock using the Purely Pomegranate Classic Ink.
• Adhere the Very Vanilla cardstock to the Purely Pomegranate cardstock using mono.
• Punch a hole in the upper left hand corner using the Handheld Punch and tie a piece of 15/16" Wide Purely Pomegranate Satin Ribbon.


No comments:
Post a Comment